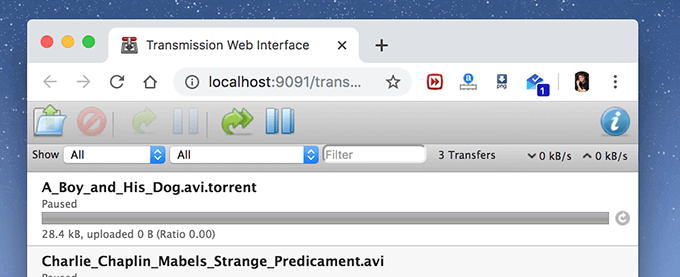
Looking to manage your torrent downloads with a sleek web interface? Transmission, a lightweight and powerful BitTorrent client, has you covered with its built-in Web GUI 🌐. In this guide, I’ll walk you through installing and configuring Transmission’s web interface on four popular Linux distros: Ubuntu, Debian, Fedora, and Arch Linux 🐧. Whether you’re running a headless server or just want remote control, you’ll be up and running in no time ⏳. Let’s get started! 🚀
What is Transmission Web GUI? 🤔
Transmission is a fast, free, and open-source BitTorrent client loved for its simplicity and low resource use ⚡. The Web GUI lets you control your torrents from any browser—perfect for headless servers or remote access from your phone 📱, smart TV 📺, or another PC 💻. It’s built into the transmission-daemon package, so no extra downloads are needed—just some setup magic ✨.

To follow along, you’ll need:
- A Linux server (headless or with a desktop) 💾.
- Root or sudo access 🔑.
- An internet connection 🌍.
Step 1: Install Transmission Daemon 📦
The Web GUI comes with transmission-daemon, so we’ll install that instead of the desktop version. Here’s how for each distro:
Ubuntu (20.04, 22.04, or later)
sudo apt update && sudo apt upgrade -y
sudo apt install transmission-daemon -y
Debian (11 or 12)
sudo apt update && sudo apt upgrade -y
sudo apt install transmission-daemon -y
Fedora (38, 39, or later)
sudo dnf update -y
sudo dnf install transmission-daemon -y
Arch Linux
sudo pacman -Syu
sudo pacman -S transmission-cli  # Includes transmission-daemon
After installation, the daemon might start automatically. Stop it for now so we can configure it:
sudo systemctl stop transmission-daemonStep 2: Configure Transmission Web GUI ⚙️
The configuration file lives in different spots depending on your distro. We’ll tweak it to enable the Web GUI, set a download directory, and add security 🔒. Open the file with a text editor (e.g., sudo nano <path>), but first, find its location:
- Ubuntu/Debian: /etc/transmission-daemon/settings.json
- Fedora: /var/lib/transmission/.config/transmission-daemon/settings.json
- Arch: /var/lib/transmission/.config/transmission-daemon/settings.json
Key Settings to Edit
Stop the daemon before editing (sudo systemctl stop transmission-daemon), or changes might get overwritten! Here’s what to adjust:
- Enable Web GUI:
"rpc-enabled": true,(This is usually true by default, but double-check!)
2. Set Username and Password:
"rpc-authentication-required": true,
"rpc-username": "your_username",
"rpc-password": "your_password",
Replace your_username and your_password with your own. The password will hash automatically when the daemon restarts.
3. Allow Remote Access:
"rpc-bind-address": "0.0.0.0",This lets you access the GUI from any device, not just localhost.
4. Whitelist IPs (Optional):
"rpc-whitelist-enabled": true,
"rpc-whitelist": "127.0.0.1,192.168.1.*",
Adjust 192.168.1.* to your network range (e.g., your home Wi-Fi). Set “rpc-whitelist-enabled“: false to allow all IPs (less secure).
5. Download Directory:
"download-dir": "/path/to/downloads",Replace with a folder like /home/user/downloads. Create it first:
mkdir -p /home/user/downloads
sudo chown -R transmission:transmission /home/user/downloads  # Ubuntu/Debian
sudo chown -R transmission:transmission /home/user/downloads  # Fedora/Arch
6. Incomplete Downloads (Optional):
"incomplete-dir-enabled": true,
"incomplete-dir": "/path/to/incomplete",
Set a separate folder for in-progress downloads:
mkdir -p /home/user/incomplete
sudo chown -R transmission:transmission /home/user/incomplete
Save the file (Ctrl+O, Enter, Ctrl+X in nano) and restart the daemon:
sudo systemctl start transmission-daemon
sudo systemctl enable transmission-daemon  # Auto-start on boot
Step 3: Access the Web GUI 🌐
Open a browser and go to:
http://<your-server-ip>:9091- Replace <your-server-ip> with your server’s IP (e.g., 192.168.1.100).
- On the server itself? Use http://localhost:9091.
You’ll see a login prompt—enter the username and password you set. Boom! You’re in the Transmission Web GUI 🎉, ready to add torrents, manage downloads, and tweak settings from anywhere!
Step 4: Optimize and Secure 🔐
Permissions
Ensure Transmission can write to your folders:
sudo chmod -R 775 /path/to/downloads
sudo chmod -R 775 /path/to/incomplete  # If used
Firewall (Optional) 🔥
Allow port 9091:
- Ubuntu/Debian (UFW):
sudo ufw allow 9091/tcpFedora (Firewalld):
sudo firewall-cmd --add-port=9091/tcp --permanent
sudo firewall-cmd --reloadArch: No default firewall, but if using UFW:
sudo ufw allow 9091/tcpRemote Access
For outside-your-network access:
- Forward port 9091 on your router to your server’s IP 🚪.
- Consider a reverse proxy (e.g., Nginx) with HTTPS for extra security—check Transmission’s docs.
Troubleshooting Tips 🛠️
- Web GUI not loading: Check if the daemon is running (sudo systemctl status transmission-daemon) and port 9091 is open.
- Permission errors: Verify folder ownership with ls -l /path/to/downloads.
- “Unauthorized” error: Ensure your IP is whitelisted or disable the whitelist.
Why Transmission Web GUI? 💡
The Web GUI is lightweight, built-in, and works everywhere—no need for extra apps unless you want them (though Transmission Remote GUI is a cool option for desktop fans). It’s perfect for managing torrents on a server from your couch 📺 or on the go 📱. Plus, it’s customizable—dig into settings.json for speed limits, peer settings, and more ⚙️.
Happy downloading! 🍿

Leave a Reply